Plywood is tough stuff, but it still needs the right finish if you want it to stay that way. Whether you’re lining a bathroom, building cabinetry, or cladding an exterior space, a good sealer will keep the moisture out and your panels looking sharp. It’s a small job upfront that saves a lot of headaches later.
However, when it comes to sealing plywood, it’s not one-size-fits-all. Different coatings suit different situations, and the way you prep and apply them matters just as much as the product you choose. We’re here to walk you through the basics of how to seal plywood, when to use each type of finish, and what to watch for along the way.
Do you really need to seal plywood?
Yes, always. Even the best sheet of plywood will take on moisture if it’s left unfinished, particularly around the edges. Sealing prevents this from happening and protects the surface from stains, UV, and general wear.
Should marine plywood be sealed too?
Yes, marine ply might handle humidity better than standard sheets, but it still needs a proper coating system to protect it from moisture ingress. No matter what the ply, to prevent swelling and damaged panels, you’ll want at least two coats of appropriate sealant, and full encapsulation for the best long-term results.
What products can you use to seal plywood?
When it comes to sealing your plywood, the right product depends on where the sheet’s going and how you want it to look. Some finishes create a strong, clear film over the surface, while others are made to soak into the timber and bring out the grain. So it’s less about finding the “best” option and more about choosing the one that suits the job.
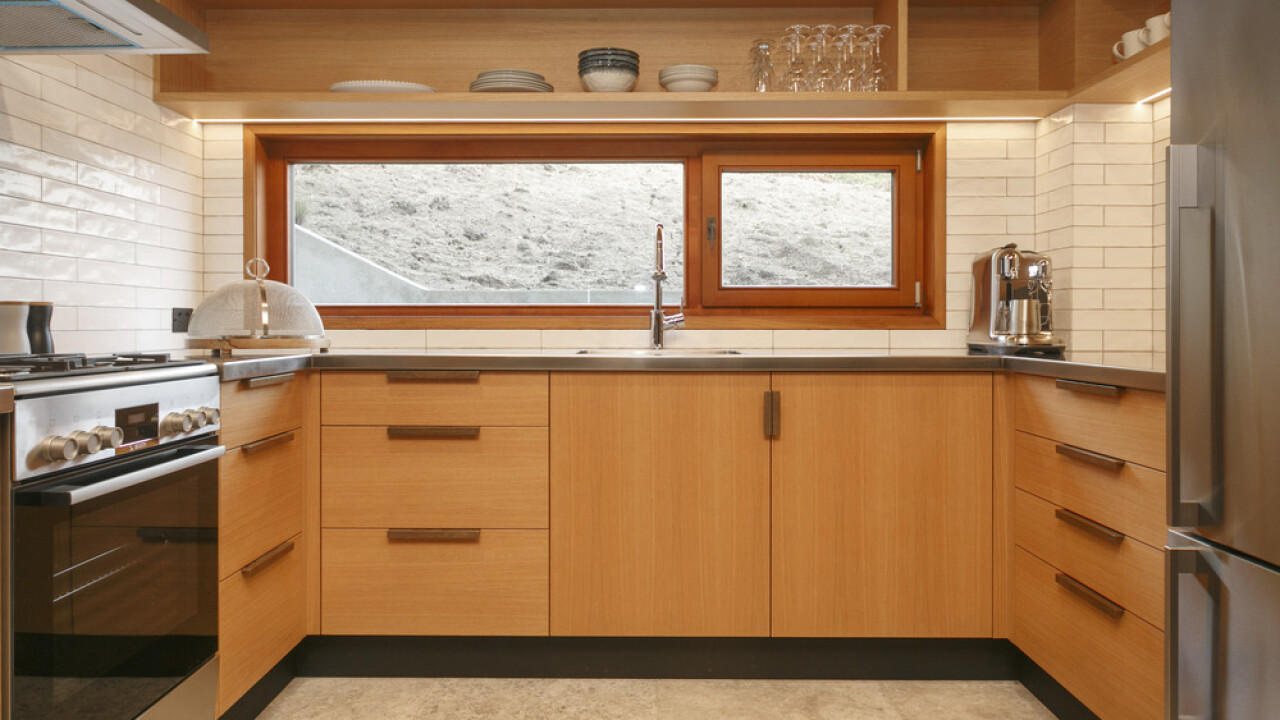
For interior work, you’ll usually find people reach for clear coats like Resene Aquaclear or a Dulux polyurethane because they’re easy to apply, give a natural finish, and hold up well in kitchens, laundries, and living spaces.
If you prefer something a little softer and more natural, Osmo Polyx-Oil is a hardwax oil that soaks into the timber rather than sitting on top, which means the surface still feels like wood. It’s popular on furniture and cabinetry because it’s durable but doesn’t look plasticky.
Some projects call for something more specialised. Bamboo benchtops, for example, need a sealer that’s approved for bamboo, like Kaboodle Clear Hardwax Oil. Bamboo behaves differently to plywood or solid timber, so a general-purpose coating won’t always cut it.
Just make sure you choose the right coating for the plywood. Indoor finishes belong indoors. Exterior finishes need UV resistance. And anything exposed to regular moisture needs a coating system that can handle it.
Note: Most products have a window they need to cure properly, and cutting that short can leave the coating soft or cloudy. Thin coats, a bit of patience, and a clean workspace do wonders for the final outcome.
How to seal plywood for indoor use
For most interior jobs, sealing plywood is a straightforward process, but the order (and the attention you give the edges) makes all the difference.
If you’re looking for the best tips on how to seal plywood for indoor use, we recommend starting with the right sanding technique. All you need is a very light sand, just enough to open up the surface so the coating can grip properly. Wipe away the dust, then lay down your first coat of plywood sealer.
Let it dry, give it a quick once-over with fine sandpaper, and apply a second coat. Most interior finishes look and perform best with two or three thin coats rather than one heavy one.
One question that comes up a lot is how to seal plywood edges. The edges are where moisture finds its way in first, even indoors, so they need as much care as the face. A small brush, a bit of patience, and a couple of extra passes along the edge will give you the best results. And don’t forget the back either - it might not be on show, but it’s a large surface for potential moisture to get in.
How to seal plywood for exterior use
Exterior work is a lot less forgiving than interior. If you’re figuring out how to seal plywood for exterior use, you need to factor in that sun, rain, and constant temperature swings are rough on timber, and plywood will show it quickly if the coating system isn’t up to the job.
Start with clean, dry sheets. Give the surface a light sand, then apply a coating that’s designed for outdoor conditions, with enough UV resistance to handle the weather. Penetrating stains with a clear topcoat, or tougher exterior polyurethanes, are the usual go-tos.
Edges matter more outside than anywhere else. If you’re trying to work out how to seal plywood from moisture, this is where you do the real work. Run extra coats along every edge, and don’t skip the back of the panel.
And remember, a coating doesn’t create waterproof plywood. You’re not turning timber into plastic, you’re just building up enough protection that rain and humidity don’t have a chance to soak in. It will still need to be maintained and resealed in line with the coating recommendations.
It’s worth noting that not all plywood is suitable for full exterior exposure, even when sealed. Exterior sealing works well, but it can’t override the limits of the sheet underneath. Make sure you’re using a treated structural grade ply that is up to the task.
For more information on the different plywood options for external use, read A Complete Guide to Marine Plywood.
How to seal plywood edges
If there’s one place to slow down a little, it’s the edges. Moisture moves through edge grain far faster than it ever will through a sealed face, which is why most failures start here. If you’re trying to figure out how to seal plywood edges, the short answer is to give them more attention than you think they need.
A light sand will tidy up any burrs, and a small brush will let you work the plywood sealer into the grain rather than skimming across the top. It’s worth running two or three thin coats around every edge, even for interior jobs, because that’s where you’ll see the benefit years or decades down the line.
Whether it’s bathroom steam, an exterior cavity, or the underside of a benchtop. Edges and backs might not get the limelight that the face does, but they’re the reason a sheet holds its shape, or doesn’t.
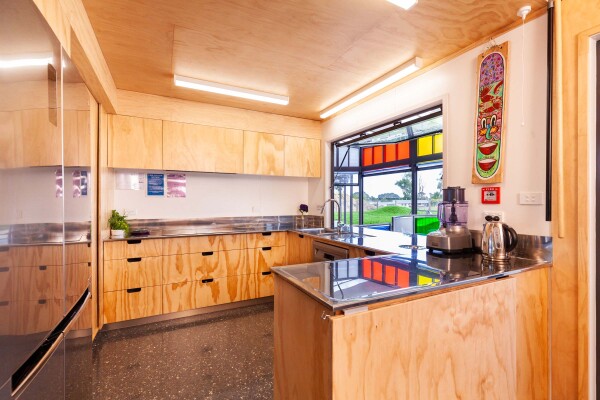
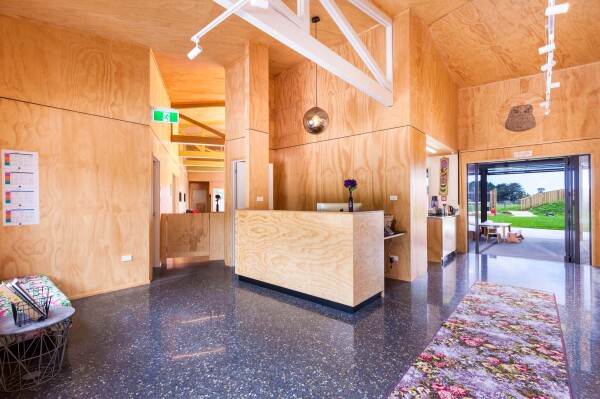
Inspiration: Ruru House
At Ruru House, ply was used to bring warmth to every surface of the space. A protective clear coat keeps the NZ Radiata Ply looking vibrant, but still true to its natural colour and texture. Even with humidity, temperature and daily wear, it will maintain its appearance and structure, settling in rather than becoming dull or patchy.
It’s a great example of how the right coating doesn’t draw attention.
Learn more
For more technical detail or to explore the full range, you can filter our plywood products by application, category, colour or range.
If you’d like help choosing the right plywood sealer or want to talk through a specific project, get in touch with the team. We can point you toward the right product, send samples, or help you work out the best approach for your plywood type and location.